Laura Christensen
How do you make a laser cutter whisper?

Laura Christensen working in her studio
By painting onto vintage photographs, Laura Christensen creates altered realities that are so seamless, it’s easy to believe they’re real.
In her own words:
“There is something about the work that is not definitive. Instead the images are open to interpretation. I think about it like a poem you might read in one part in your life, and then again 10 years later when it could mean something completely different. I hope that my art does that.”
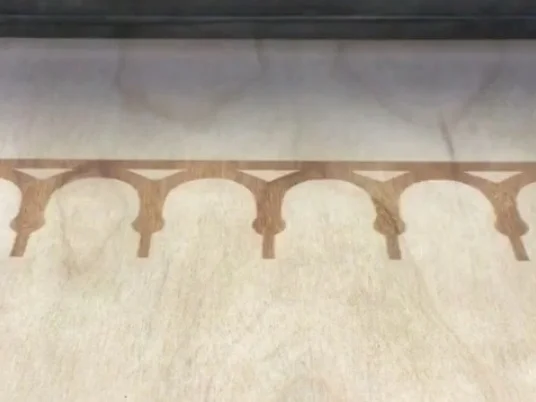
Laura’s paintings are housed in shadow boxes and cabinets she builds for each piece. In Regent’s Park, inspired by Elizabeth Bowen’s short story Tears Idle Tears, Laura wanted to subtly laser engrave a garden fence into cherry panels. An engraving so subtle, in fact, that you can barely feel an indentation.

Test on Laura’s wood (left) - Studio sample (right)

Laura’s sketch (left) - Laser-ready file (right)
Step 1: Testing
The first step of every project is material testing. We have this idea that because laser cutting is a mechanical process, we can simply enter in a factory setting and—ta-da!—amazing results. Not so fast!
Laser cutters are incredibly sensitive and any change in material makeup, such as the density or color of wood, can create different results, especially with subtle laser engraving.
Laura’s cherry wood[J1] was lighter than my shop sample. Using a piece of wood Laura provided, I did a series of tests so she could choose the effect that best suited her vision.
It’s important that the material provided for testing is exactly the same as the material used in production to ensure that the final results will be the same as the test.
Step 2: Laser-Ready File
Most of the artists I work with are not familiar with Illustrator, the vector-based program used to create laser-ready files.
Not a problem! I can create laser-ready files.
So I could create the files, Laura sent me a detailed schematic and high resolution silhouette (JPEG) of the design.
Step 3: Production
Laura provided me with three pieces of cherry cut to size. Even with the best planning it's always good to have the safety net of extra material.
Click on the video above to see how the laser engraved the lightest whisper to create a design referencing a kind of garden fence you might find in an urban community park and echoing the haunting quality of Laura’s painted photographs.
When it comes to engraving, a whole range of effects can be achieved, including different colors, depths and edge qualities. Depending of the type of wood, the engraved area may turn dark brown (cherry, maple, basswood) or light brown (poplar, birch).
There is so much to discover!

Laura Christensen - Regent's Park, 2018. Acrylic paint, vintage photographs, cherry wood, book cloth and brass.