Lower that resolution!
I can't believe I'm saying this, high resolution isn't always best. It's easy for artists to fall into the trap of assuming that high resolution always produces the best results. But with laser engraving this isn't always the case.
With laser engraving we work with image resolution in two places: the original image and the laser cutter setting. While in most cases starting with a high resolution image (300 dpi minimum) is best, increasing the resolution of the laser cutter doesn't always produce the best results.
In this post I share with how lowering the resolution of the laser cutter can improve engraving results. If you've been struggling with engraving photographs, read on!

Laser Engraving and Resolution
Achieving a full value range with laser engraving is challenging. Photographs are prone to engraving dark with high contrast. In addition to formatting the file in Photoshop, lowering how many lines per inch (LPI) the laser engraves can help significantly.
Options for engraving raster images (JPEG, TIFF) vary depending on the brand of laser cutter. I work on a Universal laser cutter where LPI is called image density (ID). The standard image density is 5 (or 90 LPI). While I use this setting for 90% of applications, there are times when lowering the image density to 3 (or 45 LPI) gives better results.
Let's take a closer look.
Part 1: Material Density
How well an image engraves at a particular resolution is directly related to the material's density.
Since the laser cutter is a heat-based medium, it engraves away more when the material is soft. When the number of lines per inch is high and the material is soft, a line can engrave wider than the diameter of the laser beam and bleed into the next line.
If your images are engraving dark, with low contrast, this might be why.
Can't you fix this by lowering the power setting? While lowering the power setting may improve clarity of the dark values, it will also lighten the light areas, causing them to drop out.
Part 2: Image Density
Let's look at an image engraved into cherry wood, using the same settings at two different image densities (below).
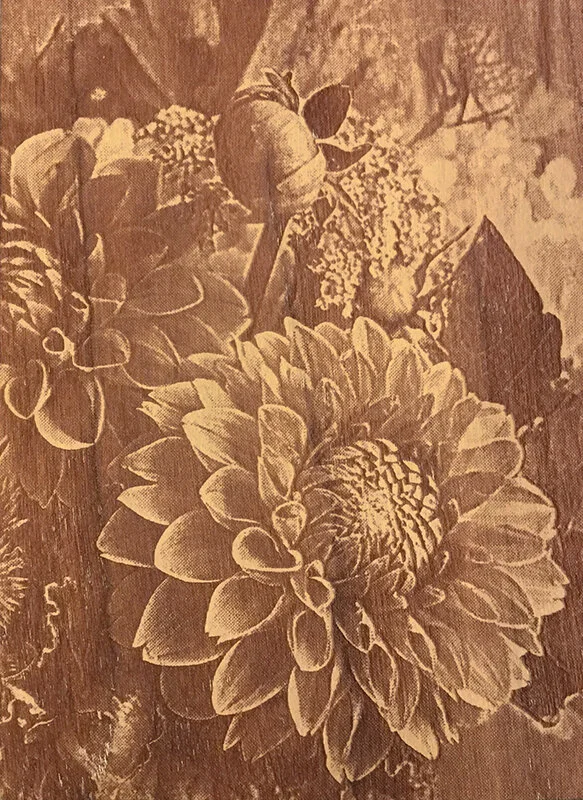
90 LPI

45 LPI
The image on the left was engraved at 90 LPI. The result is a high contrast image, containing a limited number of values. The image on the right was engraved at 45 LPI. The subtlety and number of values here is much greater, bringing out more detail and a more pronounced sense of depth.
It's a bit counter-intuitive but with laser engraving, lowering resolution (LPI) can give you better detail than increasing resolution.
Try it for yourself!
Note
The above image was first formatted in Photoshop. I played with lightening the darkest values, darkening the lights, and increasing the sharpness.
On my machine, when the ID is 3 (45 LPI) the laser can't cut vector lines. To cut out the block, I had to send the vector cut in a separate job with the ID set to 5. Check to see if lower resolutions affect cutting on your machine.