Laser Engraving Photographs
Frustration with Photographs
Click to watch
Struggling to get good results laser engraving photographs?
I recently had a client who asked that two photographs be laser engraved onto wood. I didn't tell him, but I was dreading the job. Formatting photographs to output successfully as laser engraved images can be a daunting challenge, and too often a "good" result isn't nearly as good as you'd imagined.
The job I was dreading turned into a new discovery when by chance I engraved the image too light. I took the mistake and turned it into an opportunity for "what if" problem solving. And, voila--a new way of creating laser-engraved photographs with greater depth was born.
Below I explain the inherent challenges of laser engraving photographs and describe my new discovery, followed by instructions outlining key steps in the process. My instructions are based on working with a Universal VLS 6.60 and my personal approach favors manual settings over machine presets. Much like developing a photograph, a range of visual effects can be achieved with a single image if you explore a variety of options.
Now let's begin....
THE PROBLEM
The challenge with laser engraving photographs is that the laser cutter translates the digital image into its own language. This is like trying to communicate in another language when you only have a phrasebook: you might be able to get the basic idea across but specificity is lost.
As you can see below, a photograph that looks good on screen doesn't necessarily look good when engraved.


Part of the problem is how the laser cutter translates the value and contrast relationships. Settings that are optimal for light areas are different from those that are optimal for dark areas. As a result, choosing an average setting to accommodate both creates an image with skewed value and contrast relationships.
There are ways to improve the results by tweaking the photograph in PhotoShop, and many laser cutters have internal programs to help achieve better results. But, as you can see below, while a reformatted photograph produces better results, the engraved image is still muddy.


THE SOLUTION
The secret is to engrave the image in two passes. This creates a more dimensional image in much the same way that glazing multiple transparent layers of paint creates a richer color than a single opaque layer.
In this video you can see the second-pass engraving on top of the first, lighter pass. But how is it possible to engrave the dark values in the second pass without interfering with the light values? I've got a trick, but first we have to do some formatting.

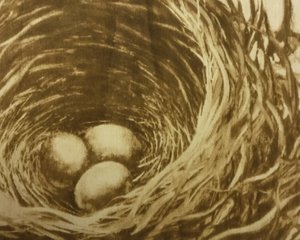
Laser-engraved photograph using Two-Pass Method
LET'S GET STARTED
Note: These instructions are written for those with laser-cutting experience and focuses on key parts of the process. If you are new to laser cutting, these instructions will seem incomplete because they are. There came a point when I realized that I was writing a blog post, not a book, and had to start being selective. Also, I am using a Universal laser cutter. If you are using another brand you may need to adjust the approach.
STEP 1: Reformatting the Image: if you are not a PhotoShop master
As we learned above, the laser cutter isn't great at translating photographic images without some assistance. The key is to lighten the dark areas, so they don't fill in, and then to selectively sharpen areas where you want a dark accent. Don't go overboard with the sharpening tool--it's easy to do. Below is a quick video with tips on how to format photographs for laser engraving.
Note: If you are using the Two-Pass Method, you don't need to alter the image as much as is shown in this video. You do need to lighten the dark areas, but in doing so, take care not to lose the light values or create too many white areas. One benefit of the two-pass method is that you can engrave a range of light values without over-darkening the darks.
How do you know if you formatted the image correctly? You wont know until you engrave it, which leads to the next step and my favorite part--step tests!
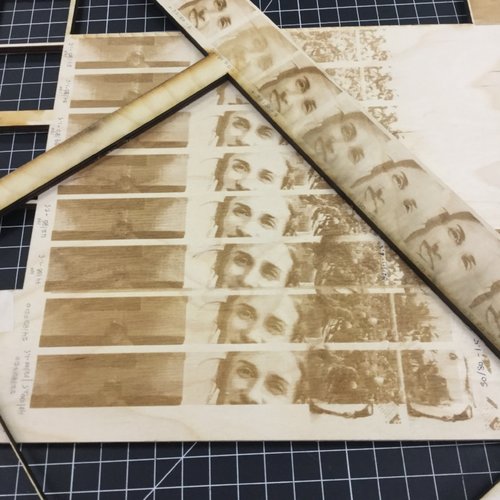
STEP 2: Step Tests: where the magic begins
Doing a step test (a process originally used to figure out exposures for developing photographs) will help you, in a systematic way, find the optimal settings for your image and the material you are engraving. Most people want to skip step tests but they are especially important. Plugging in generic settings is like only using paint out of the tube instead of mixing your own colors. You limit both the medium and your artistry if you don't do step tests, because there is more than one way to develop an image. Settings can vary depending on the size of your image and the material. Those that work for birch are different from those that work for basswood. Settings that work when an image is 4" x 6" might not work when an image is 11" x 14".
Besides, you are an artist! You want a custom image that fits your vision, not a generic reproduction.
There is so much more to say about creating step tests. I could write an entire post on the process! Come to think of it, I will. To read it before it appears on my website, sign up for my newsletter.
STEP 3: The Two-Pass Method
Now we finally come to the secret of the Two-Pass Method--how to engrave the light and dark values "separately" using the same photograph. It all comes down to the focal distance (the distance it takes to focus the laser beam on the material). A focused laser beam creates the quintessential fine laser-cut line, but something wonderful also happens when you unfocus the beam. The beam becomes wider, creating a thicker line, and when engraving, the wider beams overlap on themselves, creating richer darks.

Focused beam (left). Unfocused beam (right).

The thickness of an unfocused beam creates an overlap, increasing the darkness of that area.
When engraving grayscale images (photographs or tonal drawings) the laser cutter converts the image to a half-tone and varies the power setting based on an 8-bit grayscale. The laser cutter systematically decreases the strength of the pulse as the value becomes lighter. Not only does this create a range of values but it also increases the depth of the engraving in the dark areas.
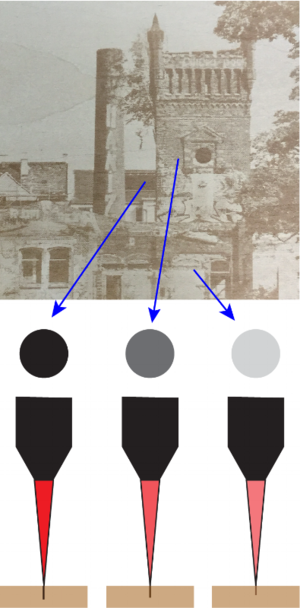
First pass, with focused beam. The power of the laser beam decreases as the value lightens.

Second pass, with unfocused beam
First Pass
For the first pass, focus the laser beam and choose a setting that is strong enough to register the light areas but will not engrave too darkly. This is where your step tests come in handy. The first pass will look washed out. The crisp, engraved detail will reveal itself with the second pass.
Second Pass
For the second pass, unfocus the laser beam. How much you do so will depend on what you discovered during your step tests. The unfocused beam is weaker because the energy is dispersed over a wider area. As a result, the setting can be increased without burning away too much material. In the light areas the dispersed energy works to your advantage. It is often too weak to significantly penetrate the material. This way, the second pass deepens the darks atmospherically without losing the lights.
This technique is not just for photographs. It can be used on any grayscale image. Bellow are laser engraved images done from a monotype by book artist and printmaker Valerie Carrigan.

Original monotype
Laser engraving on basswood

Laser engraving on paper